Friday, September 30, 2011

Remember the Grasscloth?

Do you remember my little grasscloth dilemma?  Just thought I'd give you an update, as it's probably been weighing on your mind.


Not sure if I mentioned it before, but I got the grasscloth through Sherwin Williams.

Well, I asked them to contact the manufacturer to see if there was anything that could be done about the extreme color variation in the two strips of wallpaper. They called me back and said the manufacturer wanted me to send all the wallpaper back to them and they would refund my money. Huh?? The paper is on the walls. Doesn't that seem a bit odd? I'm supposed to rip down the sticky paper, ball it up and how exactly would I mail a bag of crumbled paper? Were they smoking the grasscloth?


I told them I thought that was a bit extreme, that I really liked the paper, and that it was really just two strips that needed to be replaced. Was it necessary to tear everything down?  

So this is where things stand today: I had to mail the manufacturer a sample of the grasscloth color I was trying to match. They are supposed to send a roll or two that matches better, and hopefully, I'll be able to just replace the two strips. If that plan doesn't work, I've decided I like the grasscloth enough to live with its imperfections. 


There you have it. Now you can sleep tonight. ;)

Thursday, September 29, 2011

One Thing Leads To Another

You know how it is when you make one change to your house and it starts a domino effect?

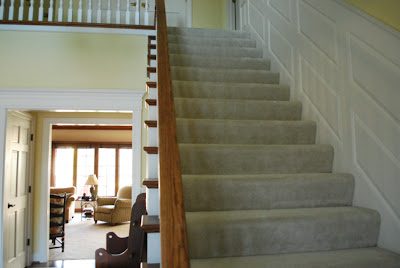
That's the case with our staircases. They started out like this...


Foyer Staircase


Kitchen Staircase

The carpet was removed and the treads were stained to match the new dark floors.


Pretty simple, huh? But then there was the issue of this ...


The current red oak nosing was going to be right up against the new dark maple floors. I wasn't crazy about the two tones of wood next to each other.  So, we decided the nosing would be painted white.  And then it seemed logical to also paint the newel posts white. 

And as long as we were changing things up, I thought a sleek black handrail would look great against all that white.


Still a couple coats of paint to go, but this is how it's coming along...


I was loving the transformation of the stairs, but there was something I wasn't loving. The paint color on my kitchen walls. 

Thanks to a 40% off sale at Sherwin Williams, I decided to make another change. Guess what I've been doing the past two days?? Uh huh... I've been a painting fool, and I've got pretty new walls and a hand cramp to prove it! Pictures coming soon... of the walls, not my hand.


Monday, September 26, 2011

Very Pinteresting: Banquettes

I love a comfy banquette! Someday, way in the future, when I forget what a pain remodeling is... I'd like to renovate our kitchen. We have large sliding glass doors that we never use, and I want to replace them with a large window and built-in window seat. Below are some beautiful spots where I could sit for hours... or maybe nap while someone else makes dinner!


Source: google.com via Susie on Pinterest

Source: bhg.com via Melva on Pinterest


Source: oakridgerevival.blogspot.com


These banquettes are all lovely, and I don't wish to compare them to anything you'd find in a cheesy restaurant. However, as I was wasting time on Pinterest researching this post, a memory came flooding back to me. My sister and I were in high school, and had gone to the local Shoney's for summer waitressing jobs. In the training session, the manager kept telling us that water glasses had to be put on the table before the customer's "fanny hit the fabric."  Even the training video was about fannies hitting the fabric. Oh my word... was this really the best summer job we could find?!

We never had to worry about how quickly to serve the water. There was a fatal stabbing there before our first day on the job, and we decided our fannies would be safer somewhere else. But I digress...

So tell me... would you like to sit by the window?

Friday, September 23, 2011

Room Updates... Finally!

Happy Friday!! I am finally re-emerging from the depths of remodeling hell and thought I'd share the latest and greatest from the living room/dining room/foyer makeover. It just may go down in history as the slowest project on the blogsphere.  If you need a refresher on what the heck we're even doing, you can read about it herehereherehere and here. It's been a long process, but the floors are finally installed on the main floor.


The stairs are a different (and long) story...


As with every project, we hit a bit of a roadblock. The treads were refinished, but there was one piece of wood that almost cost me $7,000. Like I said, it's a long story.


Here's the abbreviated version of what we were dealing with:

Stair treads are red oak.
New floor is maple.
Stair landing was supposed to be finished in the new maple flooring.
Annoying piece of oak wood was 1/4" lower than new maple flooring.
Annoying piece of oak could not be removed.
Landing would look funky with this one annoying piece of wood not matching and not at same height.

Called stair expert.
Stair expert said he couldn't remove the annoying piece of wood without removing the entire handrail, and oh by the way, both staircases are not to code and should be replaced to the tune of $7,000.
Code schmode! I'm not shelling out $7,000.
Lose an entire night's sleep, but come up with a brilliant solution. (Okay, so maybe it's not brilliant, but it saves me $7,000.)

Plan: order new red oak in the same height as annoying piece of wood to use on landing. Have it sanded and stained to match stair treads. Remove spindles from annoying piece of wood so that it can also be sanded and stained to match.

Not sure that was "abbreviated," but it's the best I could do :) 


I want to thank all of you who weighed in on my grasscloth wallpaper dilemma. I so appreciate all the comments and e-mails. I apologize if I didn't respond to everyone. P.Daddy was out of town, there were a gazillion school projects, games and practices... you know the drill... and people in and out working on the floors... blogging had to take a backseat.

I laughed when a few of you wrote to me about this bedroom on House of Turquoise. I had seen that room too, and the first thing I noticed was that the grasscloth had some funky color variation like mine. It's so nice to know I'm not alone!

I'll fill you in on the grasscloth decision later. I think I've bored you enough for now :)

And, in case I haven't said it lately, I so appreciate all of you who take the time to read my little ole blog. I can't believe there are 300 people crazy kind enough to follow my chaos! You're the best!!


Wednesday, September 14, 2011

Look What Finally Showed Up

Holla!


The floors are in da house...


Can't wait for them to finally be installed!! Prettier pictures coming soon.... I hope.

In unrelated news, I threw my back out carrying the latest "Restoration Hardware" catalog into the house. Holy cow. Have you seen the size of that thing?  Think I'll spend the next few weeks hours thumbing through it.

Peace Out :)


Tuesday, September 13, 2011

Grasscloth Wallpaper: Do You Really Want to Know?

I've recently decided that I may just be the world's worst blogger. I second guess everything! I have an idea or do something to my house and think, "I should blog about that." Then a day (or hour or minute or nanosecond) later, I think, "Oh, who cares about that." I love writing about other people's homes, but when it comes to my own, I get all weird. I mean, does anyone want to hear about how I rearranged my furniture or bought a new pillow?

Does anyone else have these thoughts, or is it just me? Well, as my mind plays games with itself, I'll share something else that I've been second guessing... my wallpaper.

I've been so excited for the arrival of the grasscloth wallpaper we're using as part of our dining room makeover. Well, it was installed last week, and I really like it.  I think. 


I love the texture of it, and the visible seams don't bother me. I knew to expect that. I also knew that there would be inconsistencies in the color, as the natural fibers absorb the dye differently. But, I'm not sure I was prepared for just how inconsistent it would be.


I ordered 4 rolls of wallpaper, and all 4 were different shades.  One was very pale, one dark, one more yellow, etc.  My installer, who works with grasscloth a lot, said that you do not install one roll after the other, or it would look strange. Instead, she cut strips from each roll, and mixed all the strips together in a pile. We then decided the order in which they would be hung.

Now, I have no idea if that is the proper way to do it. I was trusting her expertise. But, there are some areas where one strip is quite a bit darker than the one next to it.

See what I mean?


The funny thing is when I'm in the room, there's really only one strip that bugs me. But, it's that one strip that wakes me up in the middle of the night. I start thinking about it, and wondering if the paper was really installed correctly.

I hesitated writing about this. (Remember... I've got issues).  I'd like to know from you if this is normal. Not my mental issue (although feel free to comment on that)... I'm talking about the grasscloth now.  

I'd like to know that this is just the way grasscloth is, and then I'll be able to sleep at night. However, I'm scared to hear that this is not normal, the paper is defective or the installer was off her rocker. 

So, give it to me straight. I really want to know. I think.


Oh my gosh... I just had the greatest idea for a blog... "Blog Therapy." Bloggers could write in about their hangups, and we could diagnose and help them with their issues. Wait. Is that a stupid idea? Too late... I'm hitting the "publish" button....

Saturday, September 10, 2011

Monday, September 5, 2011

Chalkboard Love Notes

Hey there!! I hope you had a fabulous holiday weekend! Wouldn't it be nice if every weekend was three days long? It's so much easier to get things done around the house.

I want to share a little project that I finally found time to work on this weekend. I bought this big old frame several months ago at an antique shop.


It's chippy and worn in some areas, but I think that adds to its character. I love the ornate detail of it.


I thought it would look great framing a chalkboard.


When I first brought it home, it had a nasty, mildewed, warped backing which I promptly discarded. I went to the hardware store, and had them cut me a piece of nice, new plywood to fit in the frame.

I sanded the plywood to get it as smooth as possible. I then added a primer....


and applied two coats of chalkboard paint with a foam roller. While the paint was drying, I worked on the back of the frame. I removed the rusted eye hooks and wire, and attached ring hooks.


These ring hooks, attached directly to nails in the wall, enable the frame to mount flush against the wall.... not leaning forward like often happens with wire.

Here's the completed chalkboard hanging in the mudroom...


My husband asked why we needed a chalkboard. "To write love notes to each other?" he joked. I suppose we could, but I was thinking of leaving notes for the kids instead. Like this one...


Or this one...


Oh, I'm going to have fun with this!  :)


Linking up to...

[beforeAndAfterButton%255B3%255D.gif]


Photobucket